Understanding the Lead Lifecycle in Lead Prosper
When a lead is sent into a Lead Prosper campaign, a lot happens in a very short amount of time.
From the outside, it might look simple — a supplier sends a lead, and it either gets sold or it doesn’t. But behind the scenes, Lead Prosper runs a structured, step-by-step process to validate, enhance, filter, and match that lead with the best possible buyers.
This article walks you through that process in two ways:
- A simple, high-level overview to help you understand the flow
- A full technical breakdown showing every check in the exact order it happens
The Lead Lifecycle (Simple Overview)
At a high level, every lead follows the same core journey:
- Lead is submitted by a Supplier
- Validation & data checks run to confirm the lead is usable
- Filters and caps are applied to determine if the lead qualifies
- Eligible buyers are identified based on their settings
- The lead is distributed to those buyers in attempt to sell
- The lead is either sold or remains unsold
Every step in the lifecycle is designed to protect your campaigns and improve performance:
- Data validation ensures clean, usable leads
- Filters enforce your business rules
- Caps control volume and pacing
- Duplicate checks prevent wasted spend
- Buyer matching ensures leads go to the right destinations
- Data appending & computed fields enhance and standardize your data
All of this happens in real time, usually within milliseconds.
Full Technical Breakdown (Step-by-Step)
Below is the exact order of operations depending on how your campaign is configured.
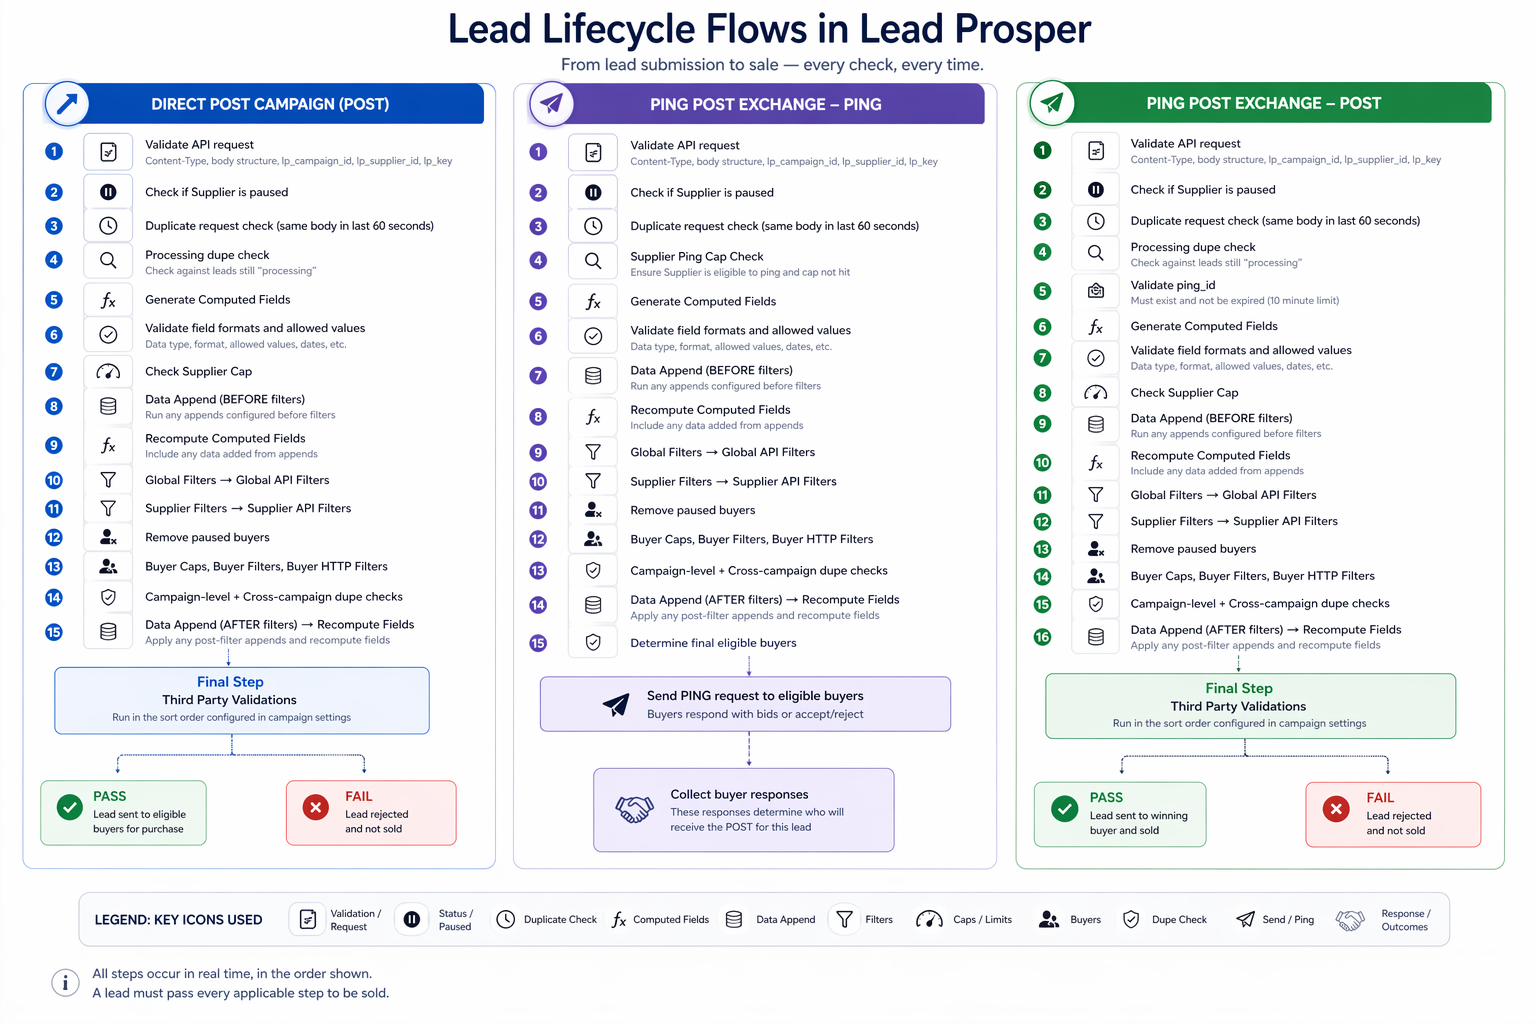
Direct Post Campaign (POST)
This is the most straightforward flow — the supplier sends a full lead, and Lead Prosper attempts to sell it immediately.
Step-by-Step Processing
- Validate API request (Content-Type, body format, required auth fields)
- Check if Supplier is paused
- Check for duplicate request (same payload within 60 seconds)
- Run real-time duplicate check against leads still processing
- Generate Computed Fields
- Validate field formats and allowed values
- Check Supplier Cap
- Run Data Appends (before filters) → recompute fields
- Run Global Filters → Global API Filters
- Run Supplier Filters → Supplier API Filters
- Remove paused buyers
- Evaluate Buyer Caps, Buyer Filters, Buyer HTTP Filters
- Run Campaign-level + Cross-campaign duplicate checks
- Run Data Appends (after filters) → recompute fields
- Run Third-Party Validations (final gate)
If the lead passes all steps, it is delivered to eligible buyers and sold if accepted.
Ping Post Exchange — PING Phase
In this phase, Lead Prosper is determining which buyers are interested before the full lead is sent.
Step-by-Step Processing
- Validate API request
- Check if Supplier is paused
- Check for duplicate request (60-second window)
- Check Supplier Ping Cap
- Generate Computed Fields
- Validate field formats and values
- Run Data Appends (before filters) → recompute fields
- Run Global Filters → Global API Filters
- Run Supplier Filters → Supplier API Filters
- Remove paused buyers
- Evaluate Buyer Caps, Filters, HTTP Filters
- Run Campaign + Cross-campaign duplicate checks
- Run Data Appends (after filters) → recompute fields
- Determine final eligible buyers
- Send PING request to buyers
Buyers respond with bids or accept/reject signals, determining who gets the POST.
Ping Post Exchange — POST Phase
This is the follow-up step after a successful ping — the lead is now sent to the selected buyer.
Step-by-Step Processing
- Validate API request
- Check if Supplier is paused
- Check for duplicate request (60-second window)
- Run real-time duplicate check (processing leads)
- Validate
ping_id(must exist and not be expired — 10 min limit) - Generate Computed Fields
- Validate field formats and values
- Check Supplier Cap
- Run Data Appends (before filters) → recompute fields
- Run Global Filters → Global API Filters
- Run Supplier Filters → Supplier API Filters
- Remove paused buyers
- Evaluate Buyer Caps, Filters, HTTP Filters
- Run Campaign + Cross-campaign duplicate checks
- Run Data Appends (after filters) → recompute fields
- Run Third-Party Validations
If all checks pass, the lead is delivered to the winning buyer.
Key Concepts to Understand
1. “Ingested” Lead
A lead is only considered ingested once it passes all validation, filters, and eligibility checks.
2. Computed Fields
These are calculated values derived from incoming data — and they may be recalculated multiple times during processing.
3. Data Appending
External or internal enrichment that enhances lead data — can run before and after filters.
4. Filters (Layered)
Filters are applied in a strict order:
- Global
- Supplier
- Buyer
Each layer narrows down eligibility.
5. Duplicate Protection
There are multiple safeguards:
- Immediate duplicate request detection (60s window)
- Processing-time duplicate checks
- Campaign-level + cross-campaign duplicate checks
6. Real-Time Buyer Matching
Buyers are dynamically evaluated based on:
- Caps
- Filters
- Status (active/paused)
While the lead lifecycle in Lead Prosper may feel complex at first, every step is intentionally designed to give you full control over lead quality and routing, while maintaining flexibility in how your campaigns are structured and optimized. At the same time, the platform ensures complete transparency, so you can always understand exactly how and why a lead was processed the way it was. If you ever need to dig deeper, the Lead Info Modal gives you a detailed, step-by-step timeline of everything that happened to a lead from the moment it was submitted through its final outcome.