Understanding & Customizing Your Lead Prosper Dashboard

The Dashboard in Lead Prosper lets you build a fully customizable reporting view centered on the metrics that matter most to your account and campaigns. Instead of a fixed layout, you can create multiple dashboards tailored to different teams or workflows, add and arrange widgets freely, and filter data by campaign, tag, or date range.
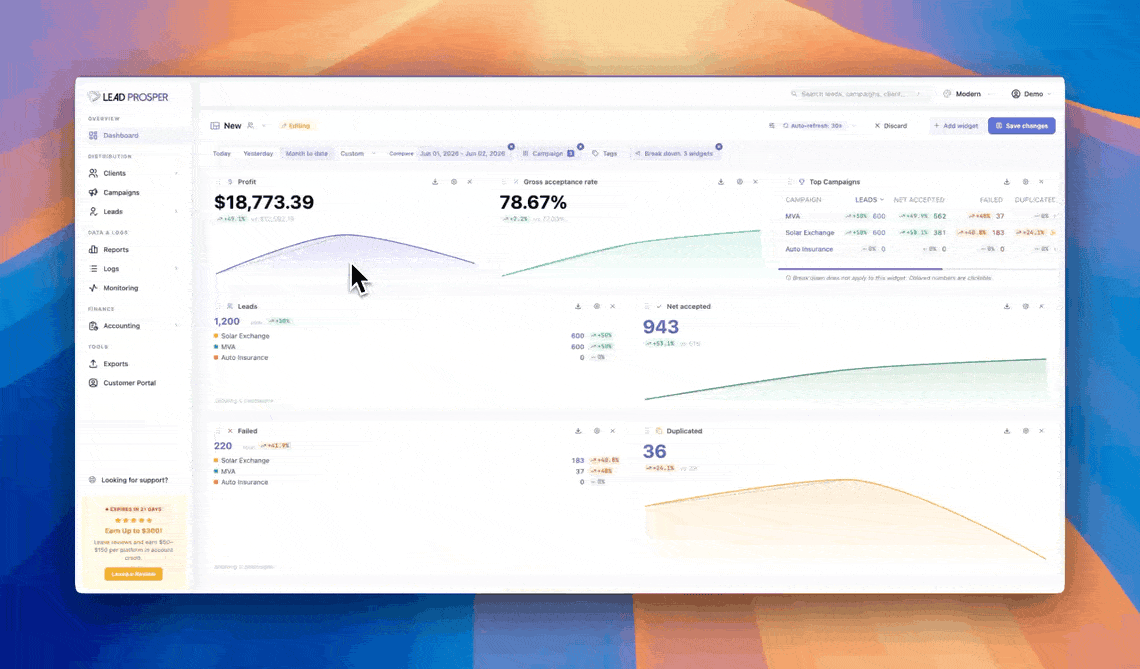
Default Dashboard
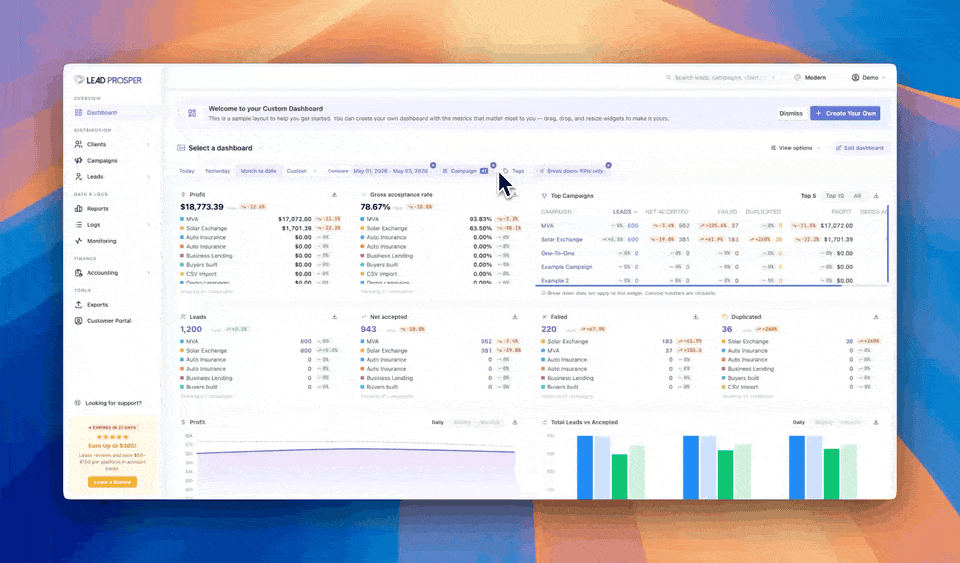
When you first sign up, Lead Prosper presents a Default Sample Dashboard as a starting point. It includes the following widgets: Profit, Gross Accepted Rates, Top Campaigns, Total Leads, Net Accepted Leads, Failed Leads, Duplicate Leads, and a Total vs. Accepted Leads chart. These defaults are meant to be a jumping-off point — you can modify or replace them at any time.
Creating a Dashboard
To create a new dashboard, select the + Create Your Own button in the top-right corner of the Dashboard. You can start from scratch or choose one of three pre-built templates:
- Basic — A minimal layout with lead volume, profit, and accepted rate at a glance.
- Basic Ping / Post — A minimal layout oriented toward Ping Post Exchanges, including leads, profits, and key ping signals.
- Detailed — A broader layout covering performance, ping/post, and financial KPIs across a wide range of metrics.
Each template can be edited and adjusted after creation.
Adding Widgets
To add a metric to your dashboard, select Add Widget. Each widget can display one or more metrics. When creating a widget, you first select the metrics to display, then choose a widget type.
Widget Types
KPI Displays a single metric as a card with a comparison delta. Best for at-a-glance tracking of a key number.
Chart Displays two metrics compared and trended over time. Includes granularity tabs and five chart styles: Line, Area, Bar, Row, or Pie.
Top Campaigns Displays your top campaigns alongside a set of metrics you choose. There is no limit on the number of metrics you can add, though it is recommended to select a focused set for quick reference. You can sort the campaign list by any available metric, including Gross Margin, Net Acceptance Rate, Accepted Leads, and others.

Each widget type supports a custom title. If no title is set, the widget displays a default title based on the metric name.
Available Metrics
Performance
| Metric | Definition |
|---|---|
| Leads | Total number of leads ingested across all campaigns, regardless of outcome. |
| Accepted | Total leads that received an accepted response from at least one buyer. |
| Net Accepted | Accepted leads minus any that were later returned by buyers. |
| Duplicated | Leads rejected because they matched an existing record based on your deduplication rules. |
| Failed | Leads that could not be processed due to system errors, timeout, or malformed data. |
| Net Acceptance Rate | Net Accepted ÷ Total Leads. Reflects true acceptance after returns are factored in. |
| Gross Acceptance Rate | Accepted ÷ Total Leads. Reflects acceptance before any returns. |
| Test Leads | Leads flagged as test submissions. Excluded from financial and performance calculations. |
Financial
| Metric | Definition |
|---|---|
| Profit | Net Revenue minus Net Cost. Your bottom-line earnings after returns. |
| Gross Profit | Gross Revenue minus Gross Cost. Earnings before returns are applied. |
| Net Revenue | Total revenue earned from buyers after returned-lead revenue is deducted. |
| Net Cost | Total cost paid to suppliers after returned-lead costs are deducted. |
| Gross Revenue | Total revenue earned from buyers before any returns. |
| Gross Cost | Total cost paid to suppliers before any returns. |
| Net Margin | Average revenue-minus-cost per lead after returns. (Net Profit ÷ Net Accepted) |
| Gross Margin | Average revenue-minus-cost per lead before returns. (Gross Profit ÷ Accepted) |
| Gross Average Cost | Gross Cost ÷ Total Leads. Average price paid per ingested lead. |
| Gross Average Revenue | Gross Revenue ÷ Accepted. Average price received per accepted lead. |
| Net Average Cost | Net Cost ÷ Net Accepted. Average cost per lead after returns. |
| Net Average Revenue | Net Revenue ÷ Net Accepted. Average revenue per lead after returns. |
Ping-Post
| Metric | Definition |
|---|---|
| Ping Accepted | Pings that received at least one accepted bid from a buyer. |
| Ping Failed | Pings that returned no accepted bids or encountered an error. |
| Total Pings | Total pings sent across all campaigns in your account. |
| Ping/Post Ratio | Total Pings ÷ Leads actually sold to buyers. Measures how many pings it takes to produce a sold lead. |
| Pre-Ping Duplicates | Pre-pings rejected because the lead was already in the system based on deduplication rules. |
| Pre-Ping Errors | Pre-pings rejected due to filter rules or cap limits before a full ping was sent. |
| Total Pre-Pings | Total pre-pings received across all campaigns. |
| Total Bids $ | Sum dollar value of all bids returned to suppliers in response to pings. |
| Total Bids | Count of individual bids returned to suppliers across all pings. |
| Average Ping Bid | Average dollar value per bid across all campaigns. |
| Average Bids Per Ping | Average number of buyer bids returned per ping across all campaigns. |
Quality & Returns
| Metric | Definition |
|---|---|
| Returned Leads | Leads that were initially accepted by a buyer but later returned (e.g., bad contact info, failed verification). |
| Return Rate | Returned Leads ÷ Accepted. Percentage of sold leads that were sent back. |
| Returned Cost | Cost paid to suppliers for leads that were ultimately returned by buyers. |
| Returned Revenue | Revenue that was clawed back when buyers returned leads. |
Display and Filter Options
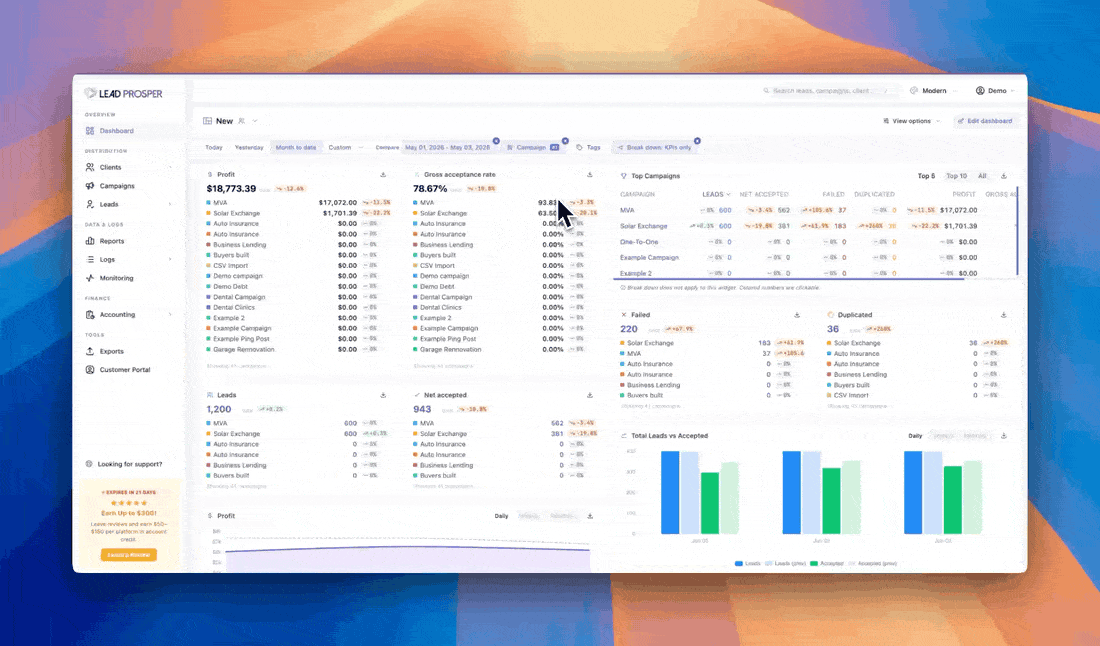
The following controls are available at the dashboard level to segment the data being displayed:
- Date Range — Select the date range to display data for.
- Compare — Select a date range to compare against your selected date range.
- Campaign — Filter to a single campaign or a selection of campaigns instead of showing all.
- Tags — If you use the Tag feature on your campaigns, filter data to campaigns with a specific tag.
- Breakdown — Choose which widgets display full per-campaign breakdowns instead of combined totals. Options: None, KPI Widgets Only, All Widgets, or Select Widgets.
Selecting View Options exposes two additional settings:
- Auto-Refresh — Automatically refresh dashboard data on a set interval. Options: Off (no refresh until page reload), 30 seconds, 1 minute, or 5 minutes.
- Text Size — Adjust the text size of dashboard items. Options: Default, Large, or Extra Large.
Rearranging and Resizing Widgets
To rearrange, resize, add, or remove widgets, select the Edit Dashboard button to enter editing mode.
While in editing mode:
- Click and drag any widget to reposition it within the grid layout. Widgets will shift and reflow as you move them.
- Resize any widget by dragging its edges. Widgets are built on a 12-column grid and can be up to 12 columns wide. There is no height limit.
- Add a new widget by selecting + Add Widget.
- Remove or edit any existing widget using its widget-level controls.
Select Save Changes to apply your layout, or Discard to revert to the previous state.
The Dashboard is built to grow with your operation. Fully customizable layouts, flexible widgets, campaign-level breakdowns, and granular filters mean you can surface the exact data your team needs — whether that's a high-level financial summary, a ping/post performance view, or something in between. Multiple dashboards let different teams or workflows maintain their own views without stepping on each other. And this is just the foundation: the Dashboard is designed as a platform for additional features and reporting capabilities coming to Lead Prosper.
If you have any questions or need help setting up your dashboards, contact Lead Prosper Support.